Creating Exchange 2010 Retention Policy Tags and Retention Policies
Retention policies can be used by organizations to limit the amount of data stored in their mailboxes and at the same time keep the amount of unnecessary mail items to a minimum.
Scenario – An organization would like to implement a policy that performs the following:
- Clear deleted items folder of items that have past their retention deadline of 30 days
- Only the last 365 days work of mail items should be in the mailbox
- These policies should not apply to default folders such as Notes and Contacts
Depending on how they’re applied to mailbox items, retention tags are categorized as the following three types.
- Default Policy Tags (DPTs), which apply to untagged items in the mailbox – untagged items being items that don’t have a retention tag applied directly or by inheritance from parent folder. You can create three types of DPTs: an archive DPT, a delete DPT and a DPT for voicemail messages
- Retention Policy Tags (RPTs), which are retention tags with a delete action, created for default folders such as Inbox and Deleted Items. Not all default folders are supported. Notably, Calendar, Tasks and Contacts folders aren’t supported
- Personal Tags, which are retention tags that users can apply to items and folders in Outlook 2010 and Outlook Web App. Personal tags can either be delete tags or archive tags. They’re surfaced in Outlook 2010 and OWA as Retention policies and Archive policies
Create Retention Policy Tags
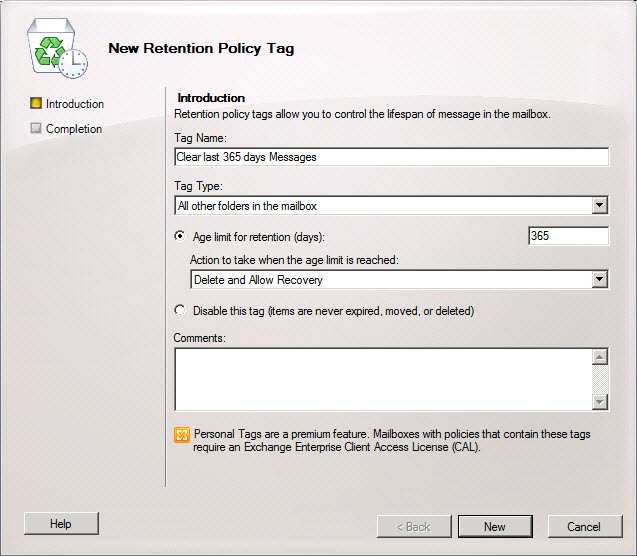
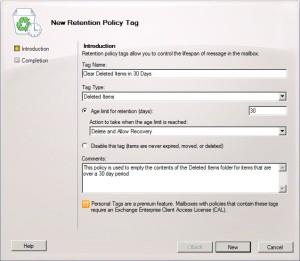
First step is to create the various tags for each of the tasks that need to be done. The first tag we are creating is for the Deleted items.
“Clear Deleted Items” Policy Tag
- In the console tree, expand the forest you want, and then navigate to Organization Configuration > Mailbox
- In the action pane, click New Retention Policy Tag
- the New Retention Policy Tag page, complete the following fields
- Tag Name Use this box to type a name for the retention tag. This is the name of the retention tag object in Active Directory. This name can contain up to 64 characters.
- Tag Type Use this list to select the type of retention tag that you want to create. To create a RPT for a default folder (for example, Inbox), select the default folder name. To create a DPT, select All other folders in the mailbox. To create a personal tag, select Personal Folder.
- Age limit for retention (days) Click this button to specify that items have a retention period. In the corresponding text box, type the number of days in the retention period. (The range of values is from 1 through 24,855 days.)
- Action to take when the age limit is reached After clicking Age limit for retention (days), you can use this list to specify what should happen to an item when it’s past the age limit for retention. The choices include:
- Delete and Allow Recovery If you select this option, messages are deleted but can be recovered by using the Recover Deleted Items feature in Outlook or Outlook Web App
- Permanently Delete If you select this option, messages are permanently deleted and aren’t recoverable by the user
- Move to Archive If you select this option, messages are automatically moved to the user’s archive mailbox. If you haven’t created an archive mailbox for the user, no action is taken.
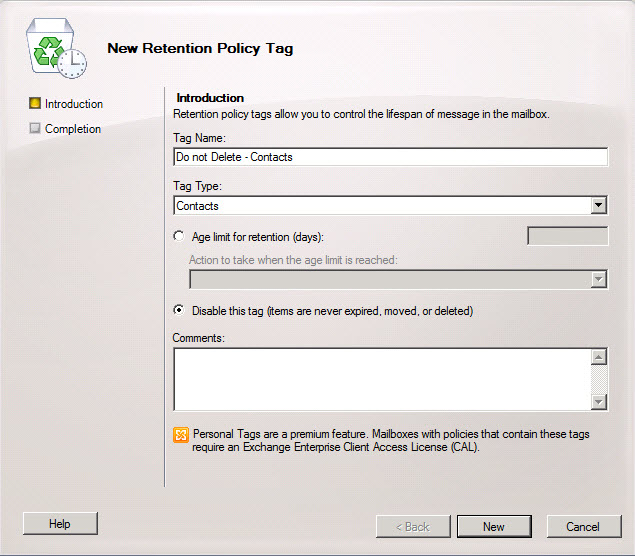
- Disable this tag Click this button to disable the processing of this tag. The Managed Folder Assistant won’t process messages that have a disabled tag applied.
- Comments Use this box to type a comment that will be displayed to the user in Outlook. For example, to alert users that MRM is enabled on the folder, you could type the following message: “Messages are removed from this folder after 120 days.” The maximum length of this comment is 255 characters.
- On the Completion page, click Finish to close the wizard
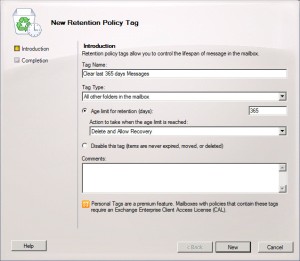
“Retain 365 Days’ Worth of Mail Data” Policy Tag
This policy tag will be configured to remove any mail item in the mailbox that is over a year old – this would mean that the mailbox would only contain items that are 365 days in age.
Follow the same steps identified in the previous section to create a new retention policy tag with the following changes:
- In the Tag Type option, select All other folders in the mailbox
- In the Age Limit for Retention option, enter 365 days
- In the Action to take when the age limit is reached select the desired action
Default Folder Tags
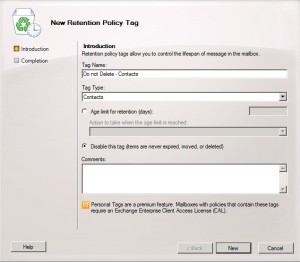
To prevent the DPT from being applied to a default folder, you can create a disabled RPT for that folder (or disable any existing RPT for that folder). The Managed Folder Assistant, a mailbox assistant that processes mailbox items and applies retention policies, does not apply the retention action of a disabled tag. Since the item/folder still has a tag, it is not considered untagged and the DPT isn’t applied to it.
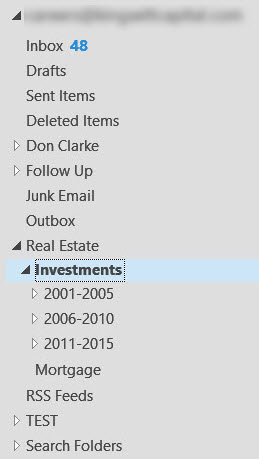
Create a retention policy tag for each of the folders (contacts, Notes, tasks and so on) you do not want a policy to apply to as shown in the image below
Create a Retention Policy to be associated with Retention Policy Tag
Using retention policies, you can group one or more retention tags and apply them to mailboxes. A mailbox can’t have more than one retention policy. Retention tags can be linked to or removed from a retention policy at any time. A retention policy with the same name as the one being created doesn’t already exist in your Exchange organization. One or more retention tags should exist so you can associate them to the new retention policy.
You can create a retention policy without linking any retention tags to it. Retention tags can be added or removed from a retention policy at any time. However, tags aren’t applied to a mailbox until they’re linked to a retention policy and the Managed Folder Assistant processes the mailbox.
- In the console tree, expand the forest you want, and then navigate to Organization Configuration > Mailbox
- In the action pane, click New Retention Policy
- On the Introduction page, complete the following fields:
- Name Use this box to type a name for the retention policy
- Add Click this button to add retention tags to the policy
- On the Select Mailboxes page, click Add to select the mailboxes to which you want to apply the retention policy
- On the New Retention Policy page, review your configuration settings. To create the retention policy, click New then click Finish to close the wizard
Apply the policy to a mailbox
You can use retention policies to group one or more retention tags and apply them to mailboxes to enforce message retention settings. A mailbox can’t have more than one retention policy.
Messages are expired based on settings defined in the retention tags linked to the policy. These settings include actions such moving messages to the personal archive or permanently deleting them. Before applying a retention policy to one or more mailboxes, it is recommended that you test the policy and inspect each retention tag associated with it.
- In the console tree, expand the forest you want, and then navigate to Recipient Configuration > Mailbox
- In the result pane, select the mailbox to which you want to apply the retention policy. You can select multiple mailboxes by using the Shift or Ctrl keys
- In the action pane, click Properties
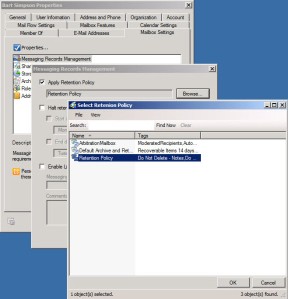
- In <Mailbox User> Properties, on the Mailbox Settings tab, select Messaging Records Management, and then click Properties
- In Messaging Records Management, select the Apply Retention Policy check box, and then click Browse to select the retention policy you want to apply to the mailbox.
- Click OK, and then in <Mailbox User> Properties, click Apply