Microsoft Surface Pro CPU Clock Speed Issue

Over the last year, we have bought a number of Microsoft Surface Pro 7 that have proven to be problematic. We identified that the CPU clock speed does not go over 1Ghz and the machine becomes extremely slow as users work on them.

After researching and testing all solutions, none of them seem to resolve the issue. Found this posting on Microsoft forum that has most of the common fixes (Surface Pro 7 CPU stuck at low clock speed [Possible Fixes & – Microsoft Community) however none of them worked for us.

Few days ago, I came across this article (Best practice power settings for Surface devices – Surface | Microsoft Docs) that talks about the how the “Surface dynamically fine tunes how power flows to individual hardware components“.

In the same article, it talked also about “Surface is imaged with a custom power profile that replaces legacy sleep and energy consumption functionality with modern standby features and dynamic fine tuning. This custom power profile is implemented via the Surface Serial Hub Driver“.

By disabling the Surface Serial Hub Driver, we are now getting speeds over 3 Ghz on the same device. To disable this service:

  • Go into the registry of the machine by using Regedit.msc
  • Go to HKLM\SYSTEM\CurrentControlSet\Services\SurfaceSerialHubDriver and locate the START attribute
  • Change its value to 4 and restart the device
  • Check Task Manager to confirm CPU clock speed

IMPORTANT NOTE!
After restarting, the machine will function faster HOWEVER note that the power\battery icon will be gone! you will not be able to determine battery life on the device. Also if you run powercfg.exe /batteryreport it will state that no battery is installed!

Export All Exchange Mailboxes with Send-As, Full Access & Send-On-Behalf-Of Permissions

There are many times when I need to get a list of all mailboxes that have full control or Send-As permissions assigned to them. In an organization with hundreds or thousands of mailboxes, using the console is not intuitive and sometimes you have to run multiple PowerShell scripts to get the results you need.

I created the script below to help with this. The script will:

  1. Export a list of ALL mailboxes in your Exchange organization
  2. dump all users who have full access to the mailbox
  3. dump all users who have send-as permission to the mailbox
  4. dump all users who have send-on-behalf-of permission to the mailbox

The script will create a TXT file but if you open it in using Excel, you can put the data into columns by using the character caret “^” symbol as the delimiter.

You will still need to do some formatting of the spreadsheet to properly separate the permissions column so that you can read the user list – will continue working on updating the script to better view the results.

Copy the contents below into Notepad and save it as a .PS1 file.

===========================SCRIPT START====================================

$OutFile = “C:\Permissions\Exported_List_of_ALL_Access_Permissions.txt”
“DisplayName” + “^” + “Email Address” + “^” + “Full Access” + “^” + “Send As” + “^” + “Send On Behalf Of” | Out-File $OutFile -Force
 
$Mailboxes = Get-Mailbox -resultsize unlimited | Select Identity, Alias, DisplayName, DistinguishedName, WindowsEmailAddress
ForEach ($Mailbox in $Mailboxes) {
#$SendOnBehalfOf = Get-mailbox $Mailbox.identity | select Alias, @{Name=’GrantSendOnBehalfTo’;Expression={[string]::join(“;”, ($_.GrantSendOnBehalfTo))}}

$SendOnBehalfOf = Get-mailbox $Mailbox.identity | % {$_.GrantSendOnBehalfTo}

$SendAs = Get-ADPermission $Mailbox.identity | where {($_.ExtendedRights -like “*Send-As*”) -and -not ($_.User -like “NT AUTHORITY\SELF”) -and -not ($_.User -like “s-1-5-21*”)} | % {$_.User}

#$FullAccess = Get-MailboxPermission $Mailbox.Identity | ? {$_.AccessRights -eq “FullAccess” -and !$_.IsInherited} | % {$_.User}
 
$FullAccess = Get-MailboxPermission $Mailbox.Identity | ?{($_.IsInherited -eq $False) -and -not ($_.User -match “NT AUTHORITY”)} |Select User,Identity,@{Name=”AccessRights”;Expression={$_.AccessRights}} | % {$_.User}

$Mailbox.DisplayName + “^” + $Mailbox.WindowsEmailAddress + “^” + $FullAccess + “^” + $SendAs + “^” + $SendOnBehalfOf  | Out-File $OutFile -Append    }

===========================SCRIPT END====================================

Windows 10 Direct Access and Home Folders

I was setting up DirectAccess for a client that has a small number of users. The implementation of DirectAccess went very smoothly with no glitches. We tested connectivity and all was working great – business applications connect to internal servers successfully, mapped folders through GPOs got reconnected and so on.

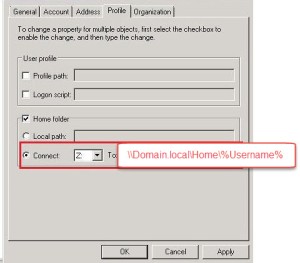
The one issue I discovered is with the home folders. In active directory, each user has a home folder setting as below:

Home Folder setting for Users

The path is configured to \\domainname.local\home\%username% because we are using DFS for the home folders.

When the users go home, they complain they cannot access their home folders but can access everything else. What I noticed is that if the user closes their laptop and puts the machine to sleep before they leave the office and then go home and login, they do not have access (it does not show up) to the home folder.

Also if the user restarts their computer at home and they log in without first establishing a wireless connection, they do not have access to the folder but once they connect, log off and back on, they DO see the folder. What I take from this is that home folders are only mapped during Logon. And I verified this as follows:

User restarts their machine at home and connects to the wireless before they log in. If they wait 20-30 seconds for DirectAccess to kick in, they see the home folder and can access it. But if they do not wait for DirectAccess to kick in, they do not see the home folder.

ISSUE

In summary, home folders that have been defined in the Home Folder settings of a user account are only mapped at user logon.

WORKAROUND

What it means for DirectAccess users is that:

  • They need to make sure they are connected to a wireless network BEFORE they log into the computer.
    • Users are able to connect to a wireless network from the logon screen.
    • Once connected to a network, allow 20-30 seconds for DirectAccess to detect its conditions and get established
    • At that point, users will be able to see their home folder
  • If the user was already logged into the machine and then only after logging in did they establish a wireless connection, advice the user to log off and back on to the computer
    • Users should be selecting the option to Connect Automatically to their home (or other trusted) wireless networks.

Sharing Non-Default Outlook Folders in Exchange (Online and On-Premise)

A client came to me one day and asked how he can share his Outlook folder to his executive assistant so that he can have read only access to one folder and its subfolders. Didn’t think it was really that difficult of a task until he showed me his Outlook folder structure. This user literally had over 1,500 folders in Outlook and the hierarchy was intense!

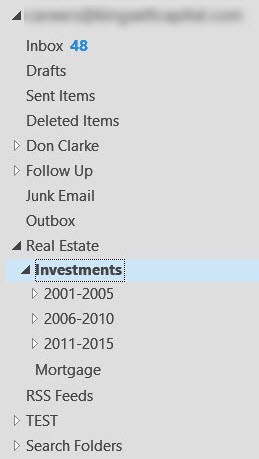
SNAG-0050

The user did not want to share the full mailbox so assigning full mailbox access was out of the question. He only wanted to share the “2011-2015” folder and all the subfolders under it, which itself was a series of at least 50 folders.

One way to do this is to go to each folder, right click and open properties. On the permissions tab, assign the executive assistant Reviewer rights – NOT GOING TO HAPPEN! Too many chances of error and takes too long.

Assigning Permissions to Outlook Folders

After researching online, I came across a blog (https://blogs.technet.microsoft.com/tips_from_the_inside/2011/11/03/set-outlook-folder-permissions-using-powershell/) that had a script doing this same thing. I have attached a copy of this and customized it for this example.

  • The user who wants to share the folder is called BWayne@thebatcave.com
  • His executive assistant is called Alfred@thebatcave.com
  • The folder we want to share is only the 2011-2015 with its subfolders


ForEach($f in (Get-MailboxFolderStatistics BWayne@thebatcave.com | where {$_.Folderpath.contains(“/Investments/2011-2015”) -eq $true} ) )
{
 $fname = “BWayne@thebatcave.com:” + $f.FolderPath.Replace(“/”,”\”);
 Add-MailboxFolderPermission $fname -User Alfred@thebatcave.com -AccessRights Reviewer
 Write-Host $fname
 Start-Sleep -Milliseconds 1000
}

Accessing Non-Default Outlook Shared Folders

Now that the permissions have been assigned how can Alfred access these shared folders. In order to do this, Alfred needs to be able to see the folder structure. These next steps must be performed from Outlook – you can either use Bruce Wayne’s machine or being the administrator, give yourself full access to his mailbox and open it in your Outlook

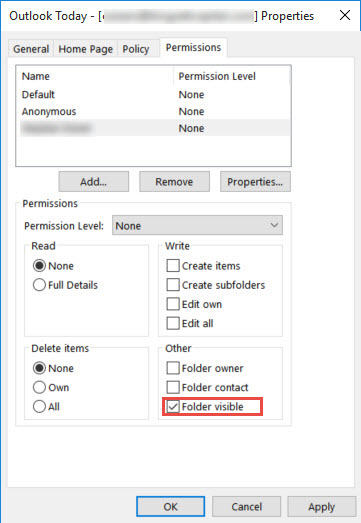
  1. In Outlook, right click the mailbox name and select Data File Properties.
  2. Click the Permissions tab.
  3. Click the Add button to select Alfred from the address list
  4. Select Folder Visible and click OK

    SNAG-0051
    Note: Permission for Alfred is still set to “None”
  5. Go down to the next folder in the hierarchy and open its Properties
  6. Repeat steps 2 to 4. This needs to be done for every folder Alfred needs to traverse through to get to the shared folder. In this example this would be:
    • BWayne@thebatcave.com mailbox \Real Estate\Investments
    • It must be noted that the Folder Visible permission only allows Alfred to view the folder but not its content.

Now that Alfred has been assigned the permission to view the folders (but not their content) he needs to get into the shared folder, he can open them using Outlook.

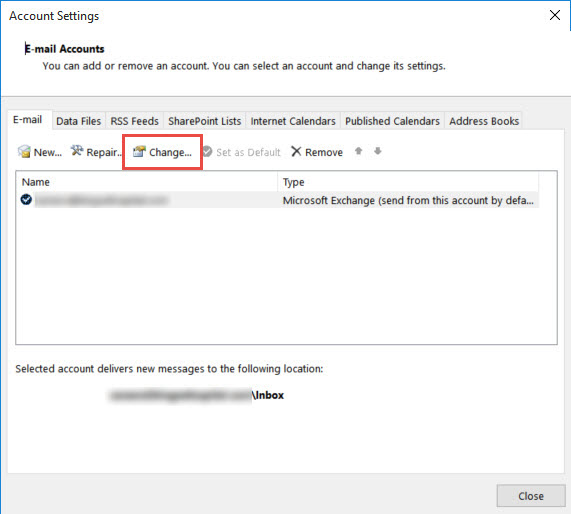
  1. On Alfred’s Outlook, open the properties of his account settings. Click on the File menu (in Outlook 2013 and 2016), Account Settings\Account Settings    
  2. On the Account Settings window, click Change SNAG-0053
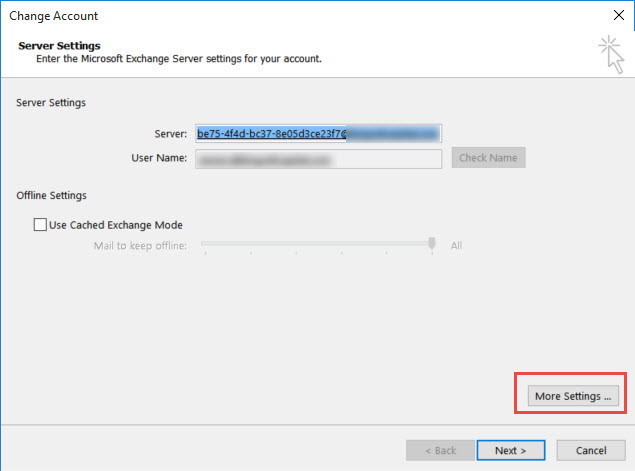
  3. On the Server Settings page, click More Settings   SNAG-0054
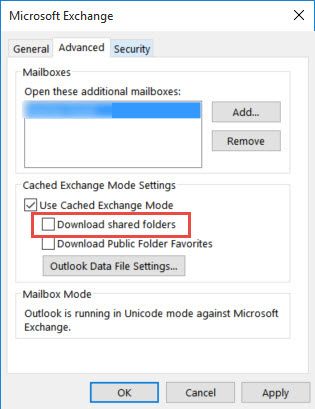
  4. Go to the Advanced tab and click the Add button to add BWayne’s mailbox to Alfred’s Outlook. Note that Alfred will not be able to see the entire mailbox – only the folders that have been set to Folder Visible and the ones he has reviewer permissions to.
  5. After adding the mailbox as an additional mailbox, make sure to uncheck the Download Shared Folders  checkbox.              SNAG-0056
  6. Click OK and Next to close the windows.


Migrate Organization from Hosted Exchange Solution to Office 365 using Cutover Migration

After having your mail system hosted by a hosting company and with Exchange Online and Office 365 becoming even more widespread and popular, you are ready to commit to the move and get away from that hosting company or ISP.

But how do you go about moving all your mailboxes, distribution groups and other exchange resources? Many,  if not all,  hosting companies will give you zero visibility to their environment so you really cannot do a regular hybrid type of migration.

The solution is to perform a cutover migration to Exchange Online. In a cutover migration, all on-premises mailboxes are migrated at the same time. to do a cutover migration, a few things to note are:

  • Your current on-premise Exchange server is running Microsoft Exchange 2003, 2007, 2010 or 2013
  • A maximum of 2,000 mailboxes can be migrated using this method of migration
  • The primary domain name used for your on-premise organization must be an accepted domain in Office 365 before you begin the migration

For more details on how this type of migration process works, check out Microsoft’s TechNet article – https://technet.microsoft.com/en-us/library/jj898490(v=exchg.150).aspx

MIGRATION STEPS

Now that the requirements are in place, here are the steps you need to perform. Please note that the assumption is you have already purchased and configured your Office 365 tenant.

Also note that Azure Active Directory Sync tool cannot be run with a cutover migration. If it has already been installed, it must be deactivated.

Step 1: Prepare for a Cutover Migration

  • Add on-premise Exchange Organization as an accepted domain in Office 365. The migration service will use the SMTP address of your hosted mailboxes to create Microsoft Online user accounts and email addresses for the new online mailboxes.

If your on-premise organization uses multiple SMTP domains, all the domains must be added and verified as accepted domains in Office 365. Once added, configure the default domain for the organization.

  • Configure Outlook AnyWhere on your on-premise Exchange server. The migration service uses RPC over HTTP to connect to the hosted Exchange server.
  • Verify Connectivity to the hosted Exchange organization using Outlook AnyWhere. This can be done either by configuring Outlook from Outsize your corporate network to connect to a hosted mailbox or by running the Microsoft Remote Connectivity Analyzer to test the connection settings.
  • Assign an on-premise user account necessary permissions to access mailboxes in the hosted Exchange organization. The user account that will be used to connect to the on-premise Exchange organization is called the migration administrator and it needs the proper permissions to access the mailboxes to be migrated.

The permissions required by the migration administrator can be either Domain Admins group member in active directory OR it can be assigned Full Access permission for each on-premise mailbox to be migrated OR it can be assigned Receive As permission for each on-premise mailbox database that stores the user mailboxes.

  • Disable Unified Messaging. Unified Messaging (UM) must be disabled on all on-premise mailboxes before migrating them. Once migrated, you can enable UM in Office 365
  • Security Groups and Delegates. A cutover migration only moves mailboxes, mail users, mail contacts and mail-enabled groups. If any other Active Directory object is assigned as a manager or a delegate to an object being migrated, it must be removed from the object before the migration process.
  • Un-hide any hidden Exchange Objects. The migration service is not able to detect any hidden objects in Exchange. If you have any mailboxes or other objects that need to be migrated and are hidden, they must be unhidden for the migration service to detect them and include them in the migration batch.

Step 2: Create a Migration Endpoint

A Migration endpoint is simply an Exchange Online object that contains the connection settings for the on-premise server hosting the mailboxes to be migrated. it includes the credentials (NetBIOS_Domain_Name\UserName and password) for the migration administrator.

To create a migration endpoint (see https://technet.microsoft.com/en-us/library/jj874458(v=exchg.150).aspx)

  1. In the EAC, navigate to Recipients > Migration. Click More More Options Icon, and then click Migration endpoints.
  2. On the Migration endpoints page, click New Add Icon.
  3. On the Select the migration endpoint type page, click Outlook Anywhere, and then click Next.
  4. On the Enter on-premises account credentials page, complete the following boxes:
    1. Email address   Type the email address of any user in the on-premises Exchange organization that will be migrated using this endpoint. Exchange Online will test the connectivity to this user’s mailbox
    2. Account with privileges   Type the user name (using the domain\user name format) for the migration administrator
    3. Password of account with privileges   Type the password for the administrator account that you specified in the previous box
  5. Click Next. Exchange Online uses the information on the Enter on-premises account credentials page to test connectivity to the source server, and then displays the Confirm the migration endpoint page. Once confirmed, click Next to continue.
  6. Enter information in the following boxes:
    1. Migration endpoint name   This name is displayed in the list of migration endpoints. It’s also used in the drop-down list of migration endpoints when you select a migration endpoint while you’re creating a migration batch. This is required
    2. Maximum concurrent migrations   This is the number of connections to the source server that are available to migrate on-premises mailboxes and mailbox items to Exchange Online during initial and incremental synchronization. If the value is set to 20, which is the default value, you can migrate up to 20 mailboxes at the same time
    3. Maximum concurrent incremental syncs   This is the number of connections to the source server that are available to perform incremental synchronizations. If the value is set to 10, the default value, then incremental synchronization can be performed on up to 10 mailboxes at the same time.
  7. Click New to create the migration endpoint.

Step 3: Create the Cutover Migration Batch

Following Microsoft’s recommendation on creating a migration endpoint first, the process to create the migration batch is as follows:

  1. In the EAC, navigate to Recipients > Migration.
  2. Click New Add Icon and then click Migrate to Exchange Online.
  3. On the Select a migration type page, click Cutover migration, and then click Next.
  4. Since the migration endpoint has already been created, the fully qualified domain name (FQDN) of your on-premises Exchange server and RPC proxy server are displayed on the Confirm the migration endpoint page. Verify the settings and then click Next
  5. On the Move configuration page, type the name of the migration batch, and then click Next. This name will be displayed in the list of migration batches on the Migration page after you create the migration batch. Batch names can’t contain spaces or special characters
  6. On the Start the batch page, do the following:
    1. Click Browse to send a copy of the migration reports to other users. By default, migration reports are sent to the administrator who creates the migration batch. You can also access the migration reports from the properties page of the migration batch
    2. Specify to Automatically start the batch so that the migration is started as soon as you save the migration batch.
  7. Click New to create the migration batch

Step 4: Configure your MX Record to Point to Office 365

Until you change your MX record, email sent to users is still routed to their on-premises Exchange mailboxes. Once the migration batch has been created, incremental synchronization process synchronizes the on-premise exchange mailboxes and the Exchange Online mailboxes once every 24 hours to keep them in-sync until you stop or delete the migration batch.

Using DNS, the MX record of the SMTP domain(s) can then be changed to the value provided by the DNS Domain setup in Office 365. AutoDiscover and other DNS records can also then be created for the domains.

Once you configure your organization’s MX record according to those settings, all email is sent directly to the Exchange Online mailboxes.

Step 5: Delete the Cutover Migration Batch

After changing the MX record, verify mail is being routed to the Exchange Online mailboxes. Once confirmed, verify the following:

  • Mail is being delivered directly to Exchange Online mailboxes
  • All users are now connecting to their Exchange Online mailboxes
  • The Exchange Online mailboxes have been synchronized at least once after the MX record change.

Once all has been verified, the migration batch can be deleted:

  1. In the EAC, navigate to Recipients > Migration
  2. On the migration dashboard, select the batch, and then click Delete Delete icon.

Step 6: Assign Licenses to Office 365 users

Using the cutover migration process, a user account is created in Office 365 for each mailbox being migrated. For those that are configured as resources or shared in a source Exchange 2010 or 2013 Server, they will be migrated as such and those do not require licenses in Office 365.

Before users can begin using their mailboxes, licenses must be assigned to activate the user account. If no licenses are assigned, the mailbox will be disabled when the 30-day grace period ends.

Best Practices

  • Configure New Outlook Profiles using GPO
  • Implement a single sign-on solution.   After all mailboxes are migrated to the cloud, you can implement a single sign-on solution to enable users to use their on-premises Active Directory credentials (user name and password) to access their Office 365 mailboxes and existing on-premises resources. You implement a single sign-on solution by deploying Active Directory Federation Services 2.0 (AD FS 2.0).
  • Change the DNS Time-to-Live (TTL) setting on your MX record.   Before you start to migrate mailboxes, change the DNS TTL setting on your current MX record to a shorter interval, such as 3600 seconds (one hour). Then, when you change your MX record to point to your Office 365 organization after all mailboxes are migrated, the updated MX record should propagate more quickly because of the shortened TTL interval
  • Updating the WindowsEmailAddress attribute   The WindowsEmailAddress attribute is used as the primary key for the cutover migration and changing the WindowsEmailAddress attribute on the on-premises side during a cutover migration isn’t recommended. If the WindowsEmailAddress attribute needs to be changed, we recommend that you remove the target MigrationUser attribute, remove the target mailbox, group and contact, and then restart the migration batch.
  • Communicate with your users.   Let users know ahead of time that you’re migrating the content of their on-premises mailboxes to Exchange Online. Consider doing the following:
    • Asking users to delete old or unnecessary email messages from their Exchange mailboxes before migration. This helps reduce the amount of data that has to be migrated and can help reduce the overall migration time.
    • Suggesting that users back up their Inboxes
    • Telling users when they can use their Office 365 user account to access the email that was migrated from their on-premises accounts. Don’t give users access to their Exchange Online mailboxes until you’re ready to switch your MX record to point to Office 365

Inter-Org Exchange Migration using PST Files

Exchange migrations are relatively straight forward – you install new Exchange servers in the Exchange organization, configure them and them move Exchange recipients to the new server. But this is assuming you are migrating with the same network, Active Directory forest or Exchange organizations.

What about when you want to migrate between Active Directory forests? Well the simplest and most direct way would be to setup a trust relationship between the forests for the two Exchange organizations may communicate with each other.

What if a trust relationship CANNOT be established due to security restrictions, network boundaries or some other reason? Well the only other option would be to use PST files.

Using PST files to do a migration has its limitations – main one being that calendar entries are broken when importing a PST file into another organization. This is because the x.500 address is unique in each organization and this is what is used when a calendar entry is created. Obviously there are other issues you need to worry about as well such as:

  • Replying to imported emails – when replying to an imported email from another member of the same organization, make sure the user exists in the address book before replying otherwise you will receive an NDR
  • Replying to a Distribution Group – Make sure the DL has been recreated in the new organization otherwise an NDR will be generated.

This blog talks about migrating an Exchange organization into another organization using PST files. Before we begin the steps taken, here are the prerequisites to this migration.

Prerequisites

Assuming that we are migrating from an Exchange organization called EXORG to another called EXNEW (wish same forest names). We are also assuming that the users will maintain their original email addresses.

  1. User accounts for all mailboxes to be migrated from EXORG must be created in the EXNEW forest. If possible, place all the users in the same OU.
  2. Create a new accepted domain for their original SMTP domain (exorg.com) and make it as an external relay domain.
  3. Create an Email address policy that assigns the SMTP address format %g.%s@exorg.com to all recipients in the OU where the users were created.
  4. Create mailboxes for these users ahead of time (you can have them hidden from the address book to avoid users sending emails to them. Also you can assign fake email addresses to the mailboxes so that valid emails from users in the EXNEW organization don’t send messages to these mailboxes).

At this point, the MX record still points to the original organization. The plan is to do the export to PST in 2 phases:

  • Phase one would be to export the bulk of the historic data from the mailboxes. The mailbox content will be exported to a certain date (for example June 30th 2015) and depending on the size of the mailboxes and the number of users, this may take some time to complete the export.
  • This will give you enough time to complete the export AND the import of this data into the empty mailboxes.
  • Phase two would be performed just before the cutover to EXNEW and would involve running another export but this time we would export everything from the last export (for example July 1st 2015) to the present. This should not take long to complete as the amount of data would be very little.

So let’s get into this!

Exporting Distribution Groups and their Members

This would be a task you need to perform only once as distribution groups hardly change.

  1. Export Distribution groups and members from EXORG environment
    1. Create a folder on the root of C:\ drive called DLS
    2. Using Notepad, create a script called EXORGDLs.PS1 and save it in the C:\DLs folder. This script will be used to export a list of all distribution groups with their unique identity (Update the script to contain the proper folder and file names for the CSV file export):

$DL = Get-distributiongroup –resultsize unlimited

$Groups = @()

Foreach ($D in $DL) {

$Groups += Get-distributiongroup –identity $D | Select DisplayName, Alias, Name, SamAccountName}

$Groups | export-csv Drive:\folderpath\FILENAME.csv -NoTypeInformation

This script will export all the distribution groups from the EXORG environment with the following attributes and their values – these will be used to create the Distribution groups in the EXNEW environment:

    • DisplayName
    • Alias
    • Name
    • SamAccountName
    1. Using Notepad, create a script called DLMembers.PS1 and save it in the C:\DLS\Members folder (a subfolder named Members must be created). The content of the script will be as follows:
    2. This script will export all the distribution group names with their members (Update the script to contain the proper folder and file names for the CSV file export).

$DL = Get-DistributionGroup –resultsize unlimited

$Output =@()

Foreach ($D in $DL) {

$Members = Get-DistributionGroupMember $D.name -resultsize unlimited

$Total = $Members.Count

$RemoveNull = $Total-1

For($i=0;$i -le $RemoveNull;$i++)

{

$userObj = New-Object PSObject

$userObj | Add-Member NoteProperty -Name “DisplayName” -Value $members[$i].Name

$userObj | Add-Member NoteProperty -Name “Alias” -Value $members[$i].Alias

$userObj | Add-Member NoteProperty -Name “Distribution Group” -Value $D.Name

$userObj | Add-Member NoteProperty -Name “Distribution Group Primary SMTP address” -Value $D.PrimarySmtpAddress

$output += $UserObj

}

$output | Export-csv -Path Drive:\folderpath\FILENAME.csv -NoTypeInformation

}

  1. Copy the C:\DLs folder to the primary exchange server at EXNEW and paste it in the same path.
  2. Create a new script in the C:\DLs folder of EXNEW Exchange called CreateEXORGDLs.PS1 using Notepad with the following content:
  3. This script will create new mail-enabled universal distribution groups in EXNEW in a predetermined OU and add the necessary members to the groups. Before running the script, update it with the proper OU path and folder\file path for the CSV file. This file was obtained in step 5-b earlier.

Write-host ”  “

Write-host “

This script will create all EXORG Distribution groups in an OU named ” Domain.com/OU-Path” in the EXNEW Active Directory”

$OU = “Domain.com/OU-Path”

$content = import-csv Drive:\folderpath\FILENAME.csv | foreach {

$Name = $_.”Name”

New-DistributionGroup -Name $_.”Name” -Alias $_.”Alias” -DisplayName $_.”DisplayName” -SAMAccountName $_.”SAMAccountName” -OrganizationalUnit $OU -Type Distribution

Write-host $Name ” DL has been created successfully”-foregroundcolor green

}

The format of the CSV file will contain columns with the following headings:

DisplayName Alias Name SamAccountName
  1. Once the groups have been created in Active Directory from the previous step, next is to add the members to the group. Previously in Step 5-c, the members of the groups were successfully exported to a CSV file. This file will be used to populate the group membership.
  2. On the EXNEW Exchange production server, create a new script named AddDLMembers.PS1 with the following content. Please update the content of this script before running it:

Write-host ”  “

Write-host “

This script will add the members to the distribution groups”

$content = import-csv Drive:\folderpath\FILENAME.csv | foreach {

$Alias = $_.”Alias”

$DL = $_.”Distribution group”

Add-DistributionGroupMember -Identity $DL -member $Alias

Write-host $Alias ” has been successfully added to the distribution group ” $DL -foregroundcolor blue

}


Steps required to export data from EXORG environment

  1. Assign a selected active directory group in EXORG the proper permissions to be able to import/export data from mailboxes to PST from Exchange Management Shell using the following command:
  2. New-ManagementRoleAssignment Role “Mailbox Import Export” –SecurityGroup “GroupName”
  3. Log onto Exchange 2010 as one of the users who is a member of the group
  4. Create a network shared folder.
    1. To export a mailbox or archive, you must first create a network shared folder.
    2. You need to grant read/write permission to the Import/export group  and the Exchange Trusted Subsystem group to the network share where you’ll export or import mailboxes
  5. Create a mailbox export request in Exchange.
    • A mailbox export request is a process of exporting mailbox or archive data to a PST file.
    • You can create more than one mailbox export request per mailbox, and each request must have a unique name. Microsoft Exchange automatically generates up to 10 unique names for a mailbox.
    • To create more than 10 export requests for a mailbox, you must specify a unique name when you create the request.
    • Although you can create multiple export requests per mailbox at one time, you can create only one request at a time per PST file. This is because the PST file is locked as in-use when the request begins to run.
    1. Open the Exchange Management Shell and run the following command to export mailbox content from a user’s primary mailbox to a PST using the following command:
    2. New-MailboxExportRequest -Mailbox UserName -FilePath \\Server\FileShare\FileName.PST

Run the following command to export mailbox content from a user’s archive mailbox to a PST:

New-MailboxExportRequest -Mailbox UserName -IsArchive –FilePath \\Server\FileShare\FileName_Archive.PST

  1. Open Notepad and paste the following script to be used to bulk export mailbox data for ALL mailboxes in the environment.
  2. Please note that the proper server name and shared folder path must be updated.

$Users = get-mailbox

foreach ($u in $users) {

$Batchname = “$u PrimaryExport”

$ArchiveName = “$U ArchiveExport”

new-mailboxexportrequest -batchname $Batchname -mailbox $U -filepath “\\SERVERNAME\SHARED_FOLDER\$U.pst”

write-host “Export of $U primary mailbox has begun”

 get-mailbox $U | where {$_.archivedatabase -ne $Null}

new-mailboxexportrequest -batchname $Archivename -mailbox $U -isarchive -filepath “\\ SERVERNAME\SHARED_FOLDER\$U-Archive.pst”

}

  1. In order to export the delta changes, copy the following script into a Notepad.

$Users = get-mailbox

foreach ($u in $users) {

 $Batchname = “$u PrimaryExport”

$ArchiveName = “$U ArchiveExport”

 new-mailboxexportrequest -batchname $Batchname -mailbox $U -filepath “\\ SERVERNAME\SHARED_FOLDER\$U.pst” -ContentFilter {(Received -ge ’07/01/2015′) -and (sent -ge ’07/01/2015′)}

write-host “Export of $U primary mailbox has begun”

}


Steps required to import data into EXNEW Environment

  1. Assign a selected active directory group in EXNEW the proper permissions to be able to import/export data from mailboxes to PST from Exchange Management Shell using the following command:
  2. New-ManagementRoleAssignment Role “Mailbox Import Export” –SecurityGroup “GroupName”
  3. Log onto the exchange server that will be used to import the PST data into the mailboxes as a member of the group
  4. Create a mailbox import request in Exchange
    1. You can create more than one mailbox import request per mailbox and each mailbox import request must have a unique name.
    2. Microsoft Exchange automatically generates up to 10 unique names for a mailbox import request. However, to create more than 10 import requests for a mailbox, you need to specify a unique name when creating the import request
    3. By default, the import checks for duplication of items and doesn’t copy the data from the PST file into the mailbox or archive if a matching item exists in the target mailbox or target archive
  1. Using the Exchange Management Shell, run the following command to import the contents of the PST back into an existing mailbox:

New-MailboxImportRequest MailboxName -FilePath \\server\Fileshare\FileName.pst

Run the following command to import PST content into an archive mailbox:

New-MailboxImportRequest MailboxName -IsArchive –FilePath  \\server\Fileshare\FileName_Archive.pst

Final Cutover Procedure

On the day of the Cutover, the following steps need to be taken in the EXNEW Exchange Environment:

  1. Prepare EXNEW to accept mail for EXORG domains
    1. In the EXNEW Exchange Administrative Center, change the accepted domain for EXORG.com to be authoritative
    2. Manually update each mailbox to have the proper email address of EXORG.COM
    3. Configure EXNEW SMTP gateway to accept mail for EXORG.COM domain forwarded to EXNEW`s exchange environment
    4. Change the MX record for  EXORG.COM to point to the EXNEW exchange environment (SMTP Gateway)
    5. At this point, any new mail generated externally destined to an EXORG recipient will be delivered to their new mailboxes at EXNEW.
  2. Prepare EXORG environment for cutover
    1. Change the  EXORG.COM accepted domains from authoritative to External Relay
    2. Reconfigure all mobile devices (BlackBerry and/or ActiveSync) to use EXNEW’s BES and ActiveSync settings
    3. Reconfigure Outlook profiles to connect to EXNEW’s Exchange environment for mail access
    4. Run a delta export of the mailboxes from EXORG exchange environment to copy data updated since the initial export
  3. Import the PST containing delta changes into the mailbox at EXNEW
Office 365 – Script to Activate New Mailbox

Script can be downloaded by clicking this Link. Rename the file to PS1 before it can be used.

Please note that once the mailbox has been created, it needs to be activated.

Details of creating new mailboxes in O365 can be found at this link

This script is used to perform the following tasks to a mailbox that has newly been created in Office 365:

  • Set usage location on O365 mailbox to Canada
  • Assigns licenses for Exchange Online, Lync Online, Office365 ProPlus and SharePoint Online
  • Enables retention policy on mailboxes
  • Please note that this script will require an input file.
  • The content of the file should be the SAMAccountName or the UPN of the newly created users in Active Directory.
  • As an example, all new users being created have a logon name of firstname.lastname – this is referred to as the SAMAccountName. The file should contain entries like – each name on its own like:

Clark.Kent
Bruce.Wayne
Bruce.Banner

    • The file can also contain the UPNs of the users in the format:

Bruce.Wayne@domain.ca
Bruce.Banner@domain.ca
Clark.Kent@domain.ca


############################################################################################################
# This script will activate the user by:
#    •    setting usage location on O365 mailbox to Canada
#    •    Assigns licenses for Exchange Online, Lync Online, Office365 ProPlus and SharePoint Online
#    •    Enables retention policy on mailboxes
############################################################################################################

######
# AUTHOR: IBRAHIM U. BENNA
######

#This function is used to create a “pause” in the script. Continuation of the script requires an input from the keyboard

Function Pause ($Message=”Press Any Key to Continue…”)
{
Write-host $Message
$Null = $host.UI.RawUI.ReadKey(“NoEcho,IncludeKeyDown”)
Write-host ” ”
}

Write-host -foregroundcolor Red “Please make sure you are running this script from the Windows Azure Active Directory PowerShell”

Echo ” ”

Pause

#Import Users to be activated from text file. If no text file input is provided, the script immediately terminates. The file must contain the logon names or the UPNs of the users being activated

If ($Args.count -eq 0) {
Write-host -foregroundcolor Red “You need to specify a file name in the command. The file should contain a list of users to be activate.”
echo ” ”
Write-host -foregroundcolor Red “Please re-run the script providing the file name using the syntax ‘New-O365UserSettings.PS1 InputFileName.txt’ ”
echo ” ”
Exit
}

# Obtain credentials for global administrator in O365
$O365Credentials = Get-Credential

#Create a remote session and connect to Office 365 using Windows PowerShell
$Session = New-PSSession -ConfigurationName Microsoft.Exchange –ConnectionUri https://ps.outlook.com/powershell/ -Credential $O365Credentials -Authentication Basic –AllowRedirection
Import-PSSession $Session
connect-msolservice -credential $O365credentials

Echo ” ”

Write-Host -foregroundcolor Green “Importing file with user accounts to be activated”

Echo ” ”
#This section will read the content of the text file
$Users = get-content $Args[0]
#This section assigns the license type
$ServicePlans = Get-MsolAccountSku | fl | Where {$_.SkuPartNumber -eq “ENTERPRISEPACK”}
$ServicePlans.ServiceStatus
$MyO365Sku = New-MsolLicenseOptions -AccountSkuId syndication-account:ENTERPRISEPACK -DisabledPlans RMS_S_ENTERPRISE,SHAREPOINTWAC

#Assign Location attribute, necessary licenses, activate user and also apply the retention policy to the user’s mailbox
Foreach ($U in $Users) {
#Sets Usage Location attribute for mailbox to Canada
echo “enabling Usage Location ”
Set-MsolUser -UserPrincipalName $U -UsageLocation CA

#Sets license to necessary options defined
echo “enabling license options ”
Set-MsolUserLicense -UserPrincipalName $U -addlicenses “syndication-account:ENTERPRISEPACK”
Set-MsolUserLicense -UserPrincipalName $U -licenseoptions $MyO365Sku
echo “$U has now been licensed in O365”

#Applies retention policy to mailbox
Start-ManagedFolderAssistant $U
echo “Archive/Retention Policy successfully applied to $U”

echo ” ”
echo ” ”
}

#Disconnects remote powershell session from O365
get-pssession | remove-pssession

Office 365 – Script to Create New Primary and Archive Mailbox

Script can be downloaded by clicking this Link. Rename the file to PS1 before it can be used.

Please note that once the mailbox has been created, it needs to be activated.

In order to create primary and archive mailboxes in Office 365, the following script can be used.

  • Please note that this script will require an input file.
  • The content of the file should be the SAMAccountName of the newly created users in Active Directory.
  • As an example, all new users being created have a logon name of firstname.lastname – this is referred to as the SAMAccountName (without the domain portion). The file should contain entries like – each name on its own like:

Clark.Kent
Bruce.Wayne
Bruce.Banner


##########################################################################
# This function is used to create a “pause” in the script.
# Continuation of the script requires an input from the keyboard.
# Pauses have been added at different steps of the script but can be safely removed.
##########################################################################

 ######
# AUTHOR: IBRAHIM U. BENNA
######

 FunctionPause ($Message=”Press Any Key to Continue…”)
{
Write-host $Message
$Null=$host.UI.RawUI.ReadKey(“NoEcho,IncludeKeyDown”)
Write-host ” ”
}
Write-host -foregroundcolor Red “Please make sure you are running this script from the Microsoft Exchange Management Shell on a machine used to manage the Exchange organization”

Echo ” ”

Pause

#Import Users to be mailbox-enabled from text file. If no text file input is provided, the script immediately terminates. The file must contain the logon names of the users being activated

If ($Args.count -eq 0) {
Write-host -foregroundcolor Red “You need to specify a file name in the command. The file should contain a list of users to be activate.”

echo ” ”

Write-host -foregroundcolor Red “Please re-run the script providing the file name using the syntax ‘New-O365Mailbox.PS1 InputFileName.txt’ ”

echo ” ”

Exit
}

#Enabling mailbox in the cloud – This section will read the content of the text file

$Users=get-content $Args[0]

Foreach ($U in $Users) {
echo ” ”

#Configuring the TargetAddress attribute on the user account in Active Directory and then enabling the mailbox in Exchange Online.
Write-host -foregroundcolor DarkYellow “Enabling remote mailbox for $u”

echo ” ”

Write-host –foregroundcolor Red “MAKE SURE YOU HAVE CHANGED THE TENANT DOMAIN IN THE SCRIPT!”

Pause

#Configuring the TargetAddress attribute on the user account in Active Directory and enabling primary mailbox for user
$routing=$u+“@TENANTNAME.mail.onmicrosoft.com
enable-remotemailbox $u -remoteroutingaddress $routing
Write-Host -foregroundcolor Yellow “$U has O365 primary mailbox enabled”

echo ” ”

#Configuring and enabling an archive mailbox for the user
Write-host -foregroundcolor DarkYellow “Enabling archive mailbox for $u”
enable-remotemailbox $u -archive
Write-Host -foregroundcolor Yellow “$U has archive mailbox enabled”
echo ” ”
}

Limiting Access to Office 365 Services

A client was looking to limit access to mailboxes from outside the corporate network in order to improve data security. Because Outlook can cache mailbox information on a local machine, they would like their users to be able to connect to Outlook only from corporate machines. These are the requirements:

  • Outlook users can only use corporate laptops to connect as long as they establish a VPN tunnel to the corporate network
  • OWA can be used from any machine without restrictions
  • ActiveSync can be used from any device but the device must be approved by an administrator

Active Directory Federation Services (AD FS) 2.0 provides a way to configure these types of policies. Office 365 customers using Single Sign-On (SSO) who require these policies can now use client access policy rules to restrict access based on the location of the computer or device that is making the request.

To enable client access policy, you must complete the following steps:

Step 1: Install the Update Rollup 2 for AD FS 2.0 package on your AD FS servers

Download the Update Rollup 2 for Active Directory Federation Services (AD FS) 2.0 package and install it on all federation server and federation server proxies. The package can be downloaded from http://support.microsoft.com/kb/2681584

Step 2: Add five claim rules to the Active Directory Claims Provider trust

After the Update Rollup 2 for Active Directory Federation Services (AD FS) 2.0 package has been installed on all federation servers and federation server proxies, and the AD FS Windows service has been restarted, use the following procedure to add a set of claim rules that make the new claim types available to the policy engine.

In this step, you will have to add five acceptance transform rules for each of the new request context claim types using the following procedure.

On the Active Directory claims provider trust, create a new acceptance transform rule to pass through each of the new request context claim types.

  1. Click Start, point to Programs, point to Administrative Tools, and then click AD FS 2.0 Management
  2. In the console tree, under AD FS 2.0\Trust Relationships, click Claims Provider Trusts, right-click Active Directory, and then click Edit Claim Rules
  3. In the Edit Claim Rules dialog box, select the Acceptance Transform Rules tab, and then click Add Rule to start the Rule wizard
  4. On the Select Rule Template page, under Claim rule template, select Pass Through or Filter an Incoming Claim from the list, and then click Next
  5. On the Configure Rule page, under Claim rule name, type the display name for this rule; in Incoming claim type, type the following claim type URL, and then select Pass through all claim values
  6. To verify the rule, select it in the list and click Edit Rule, then click View Rule Language. The claim rule language should appear as follows:
  7. c:[Type == “http://schemas.microsoft.com/2012/01/requestcontext/claims/x-ms-forwarded-client-ip”%5D => issue(claim = c);
  8. Click Finish
  9. In the Edit Claim Rules dialog box, click OK to save the rules


  1. Repeat steps 2 through 6 to create an additional claim rule for each of the following claim types shown below until all five rules have been created.
Rule Name Issued Claim
EQ-Forwarded-client-ip http://schemas.microsoft.com/2012/01/requestcontext/claims/x-ms-forwarded-client-ip
EQ-client-application http://schemas.microsoft.com/2012/01/requestcontext/claims/x-ms-client-application
EQ-client-user-agent http://schemas.microsoft.com/2012/01/requestcontext/claims/x-ms-client-user-agent
EQ-Proxy http://schemas.microsoft.com/2012/01/requestcontext/claims/x-ms-proxy
EQ-endpoint-absolute-path http://schemas.microsoft.com/2012/01/requestcontext/claims/x-ms-endpoint-absolute-path

Step 3: Update the Microsoft Office 365 Identity Platform relying party trust

This step allows you to configure what type of clients to block. At Equitable, we have created a custom block scenario – Block all external access to Office 365, except Exchange ActiveSync and browser-based applications such as Outlook Web Access or SharePoint Online.

Below is the claim rule we configured for this scenario:

exists([Type == “http://schemas.microsoft.com/2012/01/requestcontext/claims/x-ms-proxy”%5D) &&

NOT exists([Type == “http://schemas.microsoft.com/2012/01/requestcontext/claims/x-ms-client-application”, Value==”Microsoft.Exchange.Autodiscover”]) &&

NOT exists([Type == “http://schemas.microsoft.com/2012/01/requestcontext/claims/x-ms-client-application”, Value==”Microsoft.Exchange.ActiveSync”]) &&

NOT exists([Type == “http://schemas.microsoft.com/2012/01/requestcontext/claims/x-ms-endpoint-absolute-path”, Value == “/adfs/ls/”])

NOT exists([Type == “http://schemas.microsoft.com/2012/01/requestcontext/claims/x-ms-forwarded-client-ip”, Value=~”\b123\.123\.123\.1\b|\b134\.134\.134\.2\b”]) &&

=> issue(Type = “http://schemas.microsoft.com/authorization/claims/deny”, Value = “true”);

Once configured, the ADFS services were restarted and confirmed through testing to be accurate. This change only needed to be done on the first ADFS server installed in the farm as it holds the master copy of the Windows Internal Database (WID).


Setting up Hybrid Migration from Exchange 2003 to Office 365

1.1    Overview

Many companies still exist that are running Exchange 2003 as their messaging environment. Some of them are now ready to upgrade the messaging services and use Exchange Online in Office 365. This blog provides some tips and tricks on how to accomplish this task.

We will be setting up a hybrid configuration to allow for proper coexistence during the transition period to Exchange Online. In order to accommodate for coexistence, the following components are required:

  1. Exchange Hybrid Server – A hybrid deployment provides a unified email experience for the Office 365 deployment. It enables users who have on-premises Exchange Server mailboxes and users who have Exchange Online mailboxes to find one another in the global address list (GAL), to send, receive and reply to email regardless of which system is hosting their mailbox.

Exchange 2013 cannot be used as the hybrid server as it cannot coexist in the same organization as Exchange 2003. For this reason, Exchange 2010 SP3 must be used as the hybrid solution for this scenario.

    • Microsoft Online Services Directory Synchronization Server The Microsoft Online Services Directory Synchronization tool is primarily used to synchronize the Exchangeglobal address list, also known as the shared address book and provision users in a cross-premises deployment. Directory synchronization is a requirement for the hybrid deployment scenario, and it as a pre-requisite for shared cross-premises GAL, calendar and free\busy sharing, and single sign on to produce a rich seamless user experience in the co-existence phase.
    • Active Directory Federation Services Infrastructure(ADFS) – This includes both ADFS server as well as the optional yet recommended ADFS Proxy server. The ADFS infrastructure provides a Single Sign-On (SSO) like experience – Users enter their Active Directory corporate credentials to access the Office 365 Services. Check out this blog for some added information between single sign-on and same sign-on


  1. Please note that for authentication ADFS does not have to be used. You may also use Directory Synchronization with Password Synchronization to provide “Same Sign-on” experience where the user’s password is synchronized to Office 365 along with their user credentials. Authentication is handled in the cloud as opposed to being redirected back on-premise for verification.


1.2    Install and Configure ADFS

The most important operation you need to perform to provide your users with single sign-on access to the cloud service is to deploy a new AD FS federation server farm. Microsoft recommends deploying at least two federation servers in order to provide fault tolerance, load-balancing, and scalability to your organization’s AD FS production environment.

1.2.1   Installing Microsoft Online Services Sign-In Assistant

The Microsoft Online Services Sign-In Assistant (MOS SIA) provides end user with sign-in capabilities to Microsoft Online Services like Microsoft Office 365. The MOS SIA installs client components that allow desktop applications like Microsoft Outlook and Microsoft Lync to authenticate to Microsoft Online Services. The MOS SIA also provides an improved sign-in experience so users can access Microsoft Online Services without re-entering their usernames or passwords.

This is required so that ADFS can authenticate and create a proper federation session to Office 365.

1.2.2   Installing AD FS

  • Install the necessary Windows prerequisites for ADFS
  • Import the SSL certificate onto the server
  • Configure the certificate in IIS
  • Install the ADFS feature
  • Configure a service account for the federation server farm
  • Run the ADFS Federation Service Configuration wizard to create and configure the federation farm

1.3    Install and Configure Hybrid Server

In this blog I will not go into details of installation and/or configuration of the hybrid server – instead I will provide the high-level steps required to be configured.

1.3.1    Prepare for Exchange 2010 SP3 Installation

Before we can begin installing Exchange 2010 servers, the following preparation tasks need to be done.

  1. Exchange 2010 SP3 prerequisites check for the operating system being used
  2. Ensure that the Active Directory forest functionality mode is at Windows Server 2003 or higher
  3. Ensure that the Active Directory domain functionality mode is at Windows Server 2003 native mode or higher
  4. Validate that the schema master is running Windows Server 2003 SP2 or later
  5. Run EXBPA (Exchange Best Practices Analyzer) and resolve any issues reported by the tool
  6. Hybrid configuration must install Exchange 2010 SP3 at a minimum.
  7. Obtain an Exchange 2010 Hybrid Edition product key from Office 365 Support
  8. Extend Active Directory Schema with Exchange 2010 SP3

1.3.2    Install Exchange 2010 Server SP3

When installing the hybrid server, make sure to select a “typical installation” where the following three roles will be installed:

  • Mailbox role
  • Client access (CAS) role
  • Hub transport role

Each of the roles must be configured individually to allow a proper hybrid setup. During the installation, make sure the following settings are configured as follows:

Use the Configure Client Access Server external domain page to configure an external fully qualified domain name (FQDN). This is the FQDN that you give to Outlook Web App users to connect to an Exchange 2010 hybrid Client Access server. This is also the FQDN endpoint that Exchange Online will use to perform on-premises look-ups, including free/busy calendar availability. This will be completed at a later stage. Leave the check box unselected unless you have all the required DNS records already configured for a hybrid configuration
On the Mail flow settings page, browse and select the Exchange 2003 server that will be the bridgehead between the two messaging systems. This server will send emails between Exchange 2003 and Exchange 2010 and Office 365

1.3.3    Configure DNS records in an Exchange 2010 hybrid deployment

To enable Outlook 2010 and mobile clients to connect to mailboxes in the Exchange Online organization, you need to configure an AutoDiscover record on your public DNS. AutoDiscover automatically configures client settings so that users don’t need to know server names or other technical details to configure their mail profiles. Microsoft also recommends that you configure a Sender Policy Framework (SPF) record to ensure that destination e-mail systems trust messages sent from your domain and the Exchange Online Protection (EOP) service for your Office 365 organization.

  • AutoDiscover record – The AutoDiscover DNS record for your on-premises organization needs to refer requests for autodiscover.domain.com to your on-premises hybrid server. You can use either a CNAME DNS record or an A DNS record. A CNAME DNS record must refer to the FQDN of an on-premises hybrid server that has the Client Access server role installed. An A (Host) DNS record must point to the external IP address of a hybrid server or your firewall, depending on your network configuration.
  • SPF record – The SPF record for your organization uses the Sender ID Framework. The Sender ID Framework is an e-mail authentication protocol that helps prevent spoofing and phishing by verifying the domain name from which e-mail messages are sent. Sender ID validates the origin of e-mail messages by verifying the IP address of the sender against the alleged owner of the sending domain.


1.3.4    Configuring Exchange certificates in an Exchange 2010 hybrid deployment

Digital certificates are an important requirement for secure communications between the on-premises Exchange 2010 hybrid servers, clients, and the Exchange Online organization. You need to obtain a certificate that can be installed on the hybrid servers from a third-party trusted certificate authority (CA). Wildcard certificates work best for this type of setup as it can be used for both Exchange as well as ADFS infrastructure when using single sign-on.

Once the certificate has been purchased, import it onto the hybrid server and assign SMTP and IIS services to it.

1.3.5    Configuring Exchange Web Services in an Exchange 2010 hybrid deployment

Configure the external FQDN as the external URL on the Exchange Web Services (EWS), Outlook Address Book (OAB), AutoDiscover and the Exchange ActiveSync (Microsoft-Server-ActiveSync) virtual directories. If multiple hybrid servers will be used, make sure the URL is pointing to the load balanced name of the servers.

1.3.6    Configure Client Access Array

Regardless of how many hybrid servers will be used, always configure the Client Access (CAS) Array.

1.3.7    Enabling Outlook AnyWhere

Outlook Anywhere for Exchange Server 2010 provides Internet-based access to your messaging environment using an Outlook 2003/2007/2010 client. If you have enabled Outlook Anywhere on a server that is running Exchange 2010 that has the Client Access server role installed, users who are on Exchange 2010 servers that have the Mailbox server role installed can use RPC over HTTP to connect to their Exchange mailbox. This is required to be enabled for connectivity to Exchange Online.

1.3.8    Configuring management interfaces in an Exchange 2010 hybrid deployment

In order to manage the Exchange Online organization from a hybrid server in the on-premises organization, the Exchange Online organization must be added to the Exchange Management Console (EMC).

Installing Microsoft Online Service Sign-In Assistant

Before you can connect the cloud-based organization to the Exchange management console, the Microsoft Online Service Sign-in Assistant must be installed on the hybrid server(s). It basically provides you with sign-in capabilities to Microsoft online services like Office 365.

Adding Exchange Online Organization to the Management Console

You can add your Exchange Online organization to the EMC on any hybrid server by using the following steps:

  • Open the EMC on a hybrid server. In the console tree, click the Microsoft Exchange node. This is the top-most node in the tree
  • In the action pane, click Add Exchange Forest
  • In the Add Exchange Forest dialog box, complete the following fields:


    1. Specify a friendly name for this Exchange forest – Type the name of the Exchange forest. This name will display in the console tree
    2. Specify the FQDN or URL of the server running the Remote PowerShell instance – Select Exchange Online, which contains the URL necessary to access your Exchange Online organization
    3. Logon with default credential – Leave this check box unselected. You will be automatically prompted to enter the credentials for an administrator in your Exchange Online organization after you click OK.

1.3.9   Creating a new hybrid deployment

Use the New Hybrid Configuration wizard to create the foundation for the hybrid deployment. The New Hybrid Configuration wizard creates the HybridConfiguration object in your on-premises Active Directory. This Active Directory object stores the hybrid configuration information for the hybrid deployment

1.3.10Configure the hybrid deployment

Use the Manage Hybrid Configuration wizard to configure your Microsoft Exchange organization for the hybrid deployment. The Manage Hybrid Configuration wizard gathers existing Exchange and Active Directory topology configuration data, defines several organization parameters and then runs an extensive sequence of hybrid deployment configuration tasks.

2    Migration Process

Following these steps will make sure that your Exchange migration has as little issues as possible. Using these steps has proven to reduce amount of corruption during migration and even though mailboxes are migrated twice, it greatly reduces the amount of time the migration takes directly from Exchange 2003. The migration should be done in two steps.

2.1    Migrate Mailboxes from Exchange 2003 to Exchange 2010

  1. Obtain a list of Exchange 2003 mailboxes to be migrated to Office 365
  2. Using the Exchange Management Console or Management Shell, migrate these mailboxes to Exchange 2010

2.2    Migrate Mailboxes from Exchange 2010 to Exchange Online

  1. Open Internet Explorer and go to http://portal.microsoftonline.com to log into the Office 365 portal
  2. Provide the credentials for a global administrator account and sign into the portal
  3. On the Office 365 Admin Center page, click on Admin on the top right corner of the page and select Exchange Admin Center, Click on Migration
  4. Click the New button and select to Migrate to Exchange Online
  5. On the Select a migration type page, select Remote move migration (Supported by Exchange 2010 and later versions) then click Next
  6. On the Select the users page, click the Add button to manually select the mailboxes being migrated in the batch.
  7. On the Confirm the migration endpoint, confirm the URL for the on-premise hybrid endpoint is selected as the Remote MRS proxy server then click Next
  8. On the Move Configuration page,
    1. Provide the new migration batch name if mailboxes were manually selected. If mailboxes were provided through a CSV, the file name will be used as the migration batch name
    2. On the Target delivery domain, select domain.onmicrosoft.com from the drop-down menu
    3. Accept the default option for the Archive.
    4. Click Next to continue
  9. On the Start batch page,
    1. Browse and select a recipient that will receive the migration reports
    2. Select to Automatically start the batch as the Preferred option to start the batch
    3. Select to Automatically complete the migration batch as the preferred option to complete the batch
  10. Click the New button to begin the migration
  11. Once completed, assign the necessary Office 365 licenses to the migrated mailbox and confirm functionality.