In the last few months, I have worked with a few customers that have certain mailbox and Active Directory requirements regarding employees who have left the organization.
Due to possible legal reason, some organizations require that a user’s account and mailbox remain active in the organization for a period of time after the user has actually left the company. Having the mailbox active means that it can still receive emails. Some companies may have a moderator that will monitor the mailbox or maybe have the mailbox shared to another user or even redirect the emails for that mailbox to someone else. But this does not help the external senders to know that the employee is no longer with the organization and they will continue to send emails to the mailbox.
This post will show you how to use Exchange 2010 transport rules to generate custom bounce-back messages to senders so they are made aware that the recipient no longer works at that organization. In summary, this is what is required:
- Create a distribution group in Exchange
- Create a transport rule that says if a message is sent to the member of the previously created distribution group, then send a customized rejection message back to sender (other actions can be added as desired)
- Add disabled mailboxes to distribution group
Follow these steps to properly configure the transport rule:
- Open the Exchange management console. Expand the Recipient Configuration and select Distribution Group
- Create a New Distribution Groupand provide it the appropriate name. This group will contain the disabled mailboxes
- Once the distribution group has been created, navigate to Organization Configuration > Hub Transport. In the result pane, click the Transport Rules tab. In the action pane, click New Transport Rule
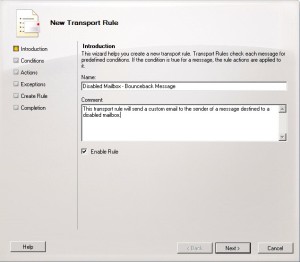
- On the Introduction page, provide a meaningful name for the rule and enter a descriptive comment (highly recommended) for the rule so other administrators know the function of it. The Enable Rule checkbox is selected by default – do not change it.

- On the Conditions page, complete the following fields:
- In the Step 1. Select condition(s) box, select Sent to a member of distribution list as the condition. Since you selected conditions in the Select Conditions box, in the Step 2. Edit the rule description by clicking an underlined value box, click the blue underlined word

- When you click a blue underlined word, a new window opens to prompt you for the values to apply to the condition. Select Disabled_Mailboxes as the values that you want to apply, or type the values manually then click OK to close the window

- In the Step 1. Select condition(s) box, select Sent to a member of distribution list as the condition. Since you selected conditions in the Select Conditions box, in the Step 2. Edit the rule description by clicking an underlined value box, click the blue underlined word
- After you configure all the conditions, click Next.
- On the Actions page, complete the following fields:
- In the Step 1. Select actions box, select Send rejection message to sender with enhanced status code as the action to take.
- In the Step 2. Edit the rule description by clicking an underlined value box, click each blue underlined word. In the new window that appears, Type the required message then click OK. Specify 5.7.1 as enhanced code. If required, multiple action statements can be selected and all will be performed if conditions match. After you configure all the actions, click Next

- On the Exceptions page, no changes were made so click Next to continue
- On the Create Rule page, review the Configuration Summary. If you’re satisfied with the configuration of the new rule, click New
- On the Completion page, review the following, and then click Finish to close the wizard:
- A status of Completed indicates that the wizard completed the task successfully.
- A status of Failed indicates that the task wasn’t completed. If the task fails, review the summary for an explanation and then click Back to make any configuration changes.

